Pages

Showing posts with label sweet. Show all posts

Wednesday, 18 March 2015

Pineapple Tarts


It feels surreal to be sitting here writing this post rather than researching for and writing my thesis. Everyone who's met me would've asked, how does it feel? Do you finally feel free? I think up until now, I don't particularly feel anything, having jumped straight from the thesis wagon to the work wagon without coming down for a stroll in between. If anything, I feel I have less time to spare. While doing my masters, I had a deadline and a big list of things to do. This meant that if I organised my time well and completed what I needed to do for each week early, then I'd have spare time for other things in life, like baking or ahem.. watching drama. Now, however, work takes up a big chunk of my time, and for the rest of the week, I've got activities packed into my schedule like books on a tight bookshelf. There's no room for a lie down in the sun (though.. what sun?) for a casual novel or magazine. 

That being said, this was what I wanted to do. It wasn't what I envisioned doing post-thesis, but I'm happy. I'm finally taking the time and putting in the effort to learn Traditional Chinese Medicine! There's a whole world of knowledge for me to learn and remember and I feel that there's no time to waste. Do you know that feeling when you're doing something that completely aligns with your beliefs and your core? This is how I feel now. Even though I'm at the infant stage and I don't know where I'll be or what I'm going to do with this knowledge in the future, or thinking more realistically, how am I going to build a career or get some income from it, it feels right. There's a voice in my head telling me, don't worry about the future, I'll naturally figure those issues out. Right now, just focus on building my library of knowledge. Everything has a natural order - growth, development, blossom, anthesis, fruiting. I should take this as my period of growth and development, put in the time and effort to water and fertilize, rather than worry about the flower and fruits that will come naturally when the timing and conditions are right. 


Anyway, pineapple tarts! Not to be confused with the Taiwanese pineapple cakes, these pineapple tarts are a must during Chinese New Year in Malaysia. We eat these by the bucket load and wherever you go during that time of year, you'll see these gold gleaming goodies lining the shelves of supermarkets or people's homes. They come in different shapes and sizes, the most common being ones where the pastry encases the pineapple filling, kind of like a miniature sausage roll. They are absolutely delicious. I mean, who can resist incredibly short, buttery pastry paired with sweet and tangy pineapples fragrant with cinnamon and other spices?

Of course, it's getting more and more difficult to get top quality pineapple tarts. The ones outside were probably made with the bare minimum of pineapple, boosted with some textural agent, and the pastry... you'd be lucky if you get ones that contain any trace of real butter. So, making your own pineapple tarts at home is the way to go! Sure, they'll take a bit of time, as all good things do, but they are seriously worth it. And it's for the new year, so you've got to spend some time preparing these golden fortune bringing cookies to bring good luck and wealth for the rest of the year. 

I know Chinese New Year is now over, but I'm thinking wayyy ahead here! You'll have a whole year to practice making these irresistible delights, because trust me, you'll want to make these throughout the year and not just for CNY because they are that good. 

Pineapple Tarts

For the filling:
1 pineapple
3/4 cups of sugar
1/2 tsp cinnamon powder
a few barks of cinnamon
1/4 tsp nutmeg
4 cloves

For the pastry:
250g butter, room temperature
60g sugar
2 egg yolks (save the egg whites for egg wash)
375g flour
1/4 tsp salt
2 tbsp cornstarch

  1. To prepare the pineapple filling, first top and tail, then skin the pineapple. Cut the pineapple into cubes and then place in a blender and blend until it reaches a smoothie consistency. Transfer pineapple to a deep pot, bring to a boil, then reduce to simmer. Add in the spices and sugar and cook until most of the water has evaporated and you get a mixture that is roll-able (There should not be any more liquid bubbling in the mixture). Set aside to cool. 
  2. For the pastry, beat together the butter and sugar until pale and creamy. Beat in the egg yolks until well combined. Sift in the flour, salt and cornstarch and mix until just combined. Place the pastry onto a sheet of cling film, roll out into approximately 0.7 cm and chill in the fridge until the pastry has hardened (about 30 minutes). 
  3. Using your cookie cutter, cut out the shapes for your pineapple tart. Brush the pastry with the egg whites for egg wash. Take about 1/4 teaspoon of pineapple filling, roll between your palms into a ball and place on the pastry. Press down so the pastry sticks. 
  4. Bake in a preheated to 180C oven for about 15 minutes or until golden. Cool on wire rack before serving. 


Monday, 9 June 2014

Triple chocolate cookies [Warning: Dangerously addictive!]


Lots of chocolate and lots of exercise makes one happy. Yesterday, I broke my own self restrictions and ate chocolate brownie cake (AMAZING, recipe will be up... eventually!) for breakfast, and lunch, and dessert. I was eating chocolate cake THE WHOLE DAY. Yum!! Then I felt guilty (but not really, since it made me happy) so I went to do some intense exercise and BAM, half an hour later, I felt so happy. Like so exhilarated about life. Like nothing will ever deter me. That's what a balanced life is about isn't it? Eating so much chocolate cake that I feel the need to exercise, then doing some intense work out so I could eat more chocolate cake!! Then repeat the next day.


Pretty much all the food I've been making these days involve chocolate. Just been craving this god-send gift everyday. What would the world be like without cacao beans? It would be a sad sad world indeed I tell ya. What would we turn to when we feel that there's an emptiness inside us that needs to be filled, a hole specifically dedicated to chocolate? Wow just thinking about that makes me wanna reach for more chocolate.


So these cookies. ARE AMAZING. Like addictively so. Like so addictive that you have to give them away to your friends to stop yourself from over-indulging in them. But then you only ended up giving away half because you wanted to keep the rest for yourself. *Sorry friends who missed out.* They're that kind of chocolate cookies that really really hit that spot, fill up that empty hole in you but then more holes just keep materialising inside you just so they could be filled with more of these cookies. These cookies are seriously that dangerous. Get in the kitchen now and start making them! Until then, you're seriously deprived.


Triple Chocolate Cookies

Makes about 25 cookies 

100g butter, room temperature
3/4 cup raw sugar, blended
1 egg
1tsp vanilla essence
1 1/2 unbleached flour
1/2 cup cocoa powder
1/2 tsp salt
1/2 tsp baking soda
3/4 tsp baking powder
1 cup dark chocolate, finely chopped

Chocolate truffle mixture 
225g dark chocolate, finely chopped
1/2 cup cream 
1tsp vanilla essence

1. For the chocolate truffle mixture: Bring the cream to boil, then pour over chocolate. Add vanilla and stir until smooth. Let sit in room temperature until cool. Place in refrigerator until use. 
2. Cream butter and sugar together until light, pale and fluffy. Add in egg and vanilla essence and beat until well incorporated. 
3. In a separate bowl, sift together flour, cocoa powder, salt, baking soda and baking powder. Add to the butter mixture and mix on the lowest speed until just combined. 
4. Add in the chopped dark chocolate and stir until just combined. 
5. Place mixture in refrigerator for 20 minutes. In the meantime, preheat oven to 170C. 
6. Take both the chocolate truffle and cookie dough out from the refrigerator. Take tablespoonfuls of cookie dough, flatten slightly, then take 1/2 teaspoonfuls of chocolate truffle mix and place in centre of cookie dough. Roll into spheres, place on tray and flatten slightly. Repeat until all cookie dough is used up. 
7. Bake in oven for about 12 minutes. 
8. Remove from oven, cool on rack and refrain from eating until cookie has cooled!
9. Enjoy. Refrain from eating all cookies in one go. 


Saturday, 24 May 2014

Chocolate Cupcake - with a secret ingredient!


It has been a while. I have been putting off writing this post. So much is happening in my life right now but I don't know how to share, where to begin. These past few months have definitely surpassed my expectations. In terms of emotions, my silly little heart has been tossed and yanked here and there. It's been crushed, and more tears than I know existed squeezed out. But it's also being patched and filled. I never expected so much love to flow inwards from all these directions. So many warm hands extended forth. They have touched me, truly. 


Life really is an adventure when you finally decided to fearlessly live it. I don't believe in regrets. Rather, I believe that every single thing that has happened, by choice or not, are like little knots making up this glorious knit of our lives. Each encounter in our lives make us who we are. It's rather coincidental in a wonderful way that several people that I talked to mentioned how incredible life is, how if it wasn't for one small incident, or one person, we would never have met. If we stop and think about the string of people in this network of our lives, and recall how we met each other, we would get so very amazed. If it wasn't because of that day when we spontaneously said yes to a spontaneous dinner invite, we would never have met. What if he'd never craved ramen? If it wasn't because that we decided to attend that club orientation, we would never have met. If we have never met, we would never have experienced so much richness in our lives, we would never have met so many other significant people in our lives. What would've happened if at that moment in time, he happened to be on the other side of the park, talking to some other people instead of us? What if it wasn't raining on that day and we never got to share that umbrella and started that conversation? What if we didn't end up sitting next to each other in that lecture? What if I was too chicken and didn't go for that audition?


Life is a series of choices. There is no right or wrong. It is ok to not know. It is ok to wait. Sometimes we really must take that leap of faith and jump even if we are scared. If we don't, we'll be stuck in the same spot forever. But we must also use sensical judgement and trust in our gut instincts. Right now, I don't know where I am going or what I am doing. I am merely following my gut, doing what feels right even though it seems like the wrong thing to do. It's healthy once in a while to just ignore our logic and listen to that voice in our hearts. And friends really are the chocolate chips in the cookie of life. From these past few months I have discovered who the people that truly care are. Without them, I'd feel lost and empty. Thus, I am eternally grateful. Grateful for those accidental and improvised encounters. Grateful for all these seemingly insignificant choices that we make every day. Grateful for a hello. Grateful for tearful laughter and ugly tears. Grateful for sleepless nights and exhausted days. Grateful for warm hugs and soulful stares. Grateful for fate and trust.

So, to celebrate these little wonders in life, let's have cake. Better still, let's have chocolate cake that errs on the guilt-free side!

Indulgent Chocolate Beetroot Cupcakes

Recipe adapted from www.deliciousmagazine.co.uk

Serves 12

250g dark chocolate, broken up
3 large free range eggs
150g raw sugar, blended
100ml vegetable oil
1tsp vanilla essence
100g self-raising flour
1/2 tsp baking soda
1/2 tsp baking powder
Pinch of salt
250g raw beetroot, finely grated 
Cocoa powder

1. Preheat oven to 180C. Line a 12-hole muffin pan with cases. 
2. In a bain-marie, melt chocolate gently, then allow to cool. 
3. Whisk together eggs, sugar and oil using an electric mixer until thick and creamy. Stir in the vanilla essence. 
4. In a separate bowl, sift together flour, baking soda, baking powder and salt. Gently fold into the egg mixture. 
5. Fold the beetroot into the cooled chocolate and fold this mixture into the egg mixture. Stir until combined. 
6. Transfer into pan and bake for approximately 20 minutes. 
7. Cool on wire rack then dust with cocoa powder.
8. Serve!


Sunday, 6 April 2014

Upside-down Peach Heart Cakelettes


This morning while I was taking a shower, my earring fell out of my ear and before I could pick it up, it rolled into the hole leaving me gaping. My immediate reaction (after I've realised what had happened) was that I felt like crying. It was just so hopeless. I have just witnessed my favourite earring, a golden star earring which I got when I got my ears pierced 15 years ago, roll... into a hole and get lost forever. Who knows where the pipe leads to? Sewage. Along with ALL the other junk that goes down that way. It's lost. LOST. 


After getting dressed and saving the other half of the earring, I just kept saying to myself. Look, this is a lesson for you to learn to let go. Yeah it has sentimental significance, but come on, it's only an earring. My only gold earring you mean. It's not life and death. You've still got the other half of the pair. What use is one earring, like I'm going to wear just one side of it. This is a chance for you to learn to let.... go.... Let go of attachments to material, let go of attachments to the value, your perceived value of it. Things come and go, it's life, get over it. 

Eventually after having breakfast and complaining to mum about me losing my earring (and of course me getting told off for not being careful, and why was I wearring earrings while I'm showering anyway?), I thought I started to accept the fact that that's what's happened, and this was karma's way of punishing me for whatever bad things I have done. Of course I felt a tiny bit better after breakfast, come one, sustainance fuels. But later on I decided, who was I fooling, I was sad that I lost my earring. So I complained to my brother. 


Or course, big brother being the ever caring and ever busy-body person he is, at first yelled (well, exclaimed) that why was I wearing my earrings while I'm showering?! Then he physically got up from his breakfast and ran to peer down the hole which the pipe from the bathtub leads to. Yeah, water, grass, black bits. But he suggested that I went to flush down some water down the hole incase it's still stuck somewhere in the pipe, and he held a net under the other end of the pipe and try catching the earring if it was still there. Without holding much hope, I did as I was told. And yeah, told you, no earring, it's probably lost to the abyss. So, giving up, I went back to my computer, deciding to crack on with my studies.


But big brother didn't want to give up. He scrounged for his torch, then went to shine it down the hole in the bathtub. Lo and behold, there! I can see it! Golden and it's tangled within hair. Ugh, gross, but WHAT?! It's still there?! So there a sparkle of hope was ignited, we began our mission of extracting my little wee golden earring out from the pipe. Thank god for once that there's hair down the pipe... After ages of manipulation, borrowing of neighbour's suck pump thing (don't know what you call it, but it's the thing that de-clogs pipes through suction), yelling from one end 'has it come out yet?', 'nope, all there is is water, and some scungy stuff', loads of effort of flushing water down the hole with force, periods of 'maybe we should just leave the net here and wait for it to eventually come out some day... ... it finally, finally, came! Oh wow, gold has fallen into the net! Stopppp flushing water down!! I see it I see it! 


I was actually super surprised that I retrieved my earring. What an evolution of emotions throughout that hour. And I thought, this incident taught me something really important. It's really simple. NEVER give up. If it's something worth fighting for, something worth the effort for, something that means so much, keep trying. Try and try and try until you have exhausted all means, and only then if it doesn't work, accept the fact that you have to let go. It applies to all sorts of things really. Relationships, work, a small task, a massive project. If you try hard enough, you'll begin to see that sparkle of light, of hope, which will really guide you through. If you don't try at all, hope is forever diminished. 

Now this recipe. Sometimes we just need to go out and buy a silicon heart-shaped mould. It makes our food look so much more exciting. Baking is so much about giving and sharing. I'm sure most bakers would agree that baking is a way to show that you love and care for somebody. Now with a heart-shaped mould, it really more strongly emphasises this love we're giving. It makes the food look pretty (and yay more exciting food photography too!). And if you're giving it to someone special, a little more effort goes a long way. Get your hands on some pretty boxes and vibrant craft paper and dress up the little gifts! Whoever you're giving it too will be impressed.

The cake itself is an olive oil sponge, incredibly moist, soft and flavourful.


Upside-down Peach Heart Cakelettes

Makes about 18 individual cakelettes, depending on the size of your tins

1 Peach
30g butter, melted
Raw sugar

Olive oil Sponge cake

150g wholewheat flour
1/4 tsp salt
5 eggs, separated
1/2 tsp cream of tartar
3/4 cup blended raw sugar
1 tsp vanilla essence
1/2 cup dessert wine or fruit juice
1/3 cup extra virgin olive oil

1. Slice the peach up into segments. Into the mould, spoon about 1/2 tbsp butter and sprinkle in about 1/4 tsp sugar. Lay three segments of peaches on the bottom of the mould. Set aside for later use.
2. To prepare the cake, preheat your oven to 180C. 
3. Sift together flour and salt, then set aside.
4. Beat the egg whites until frothy. Add in the cream of tartar and beat until soft peaks form. Gradually add half the sugar and beat until stiff. Set aside.
5. Beat the egg yolks, remaining half of the sugar and vanilla until pale and thick. Beat in the wine/juice and oil, pouring in a steady stream until they are well incorporated.
6. Gently fold in the flour mixture. Then fold in the egg whites in thirds. 
7. Pour the cake mixture in the moulds and bake for 10 minutes, then lower the heat to 160C and bake for another 10-15 minutes until golden. Turn off the oven and cover the cakes with an oiled baking paper and leave the cakes in the oven to cool slowly for 15 minutes. This gradual cooling prevents the cakes from collapsing. Remove from oven and allow cakes to cool in their moulds for 10 minutes before turning them out, running your knife around the edges of the mould to free them first. 
8. Cool slightly and serve, or cool completely and package nicely to be given away. 


Thursday, 23 January 2014

Plum tarts


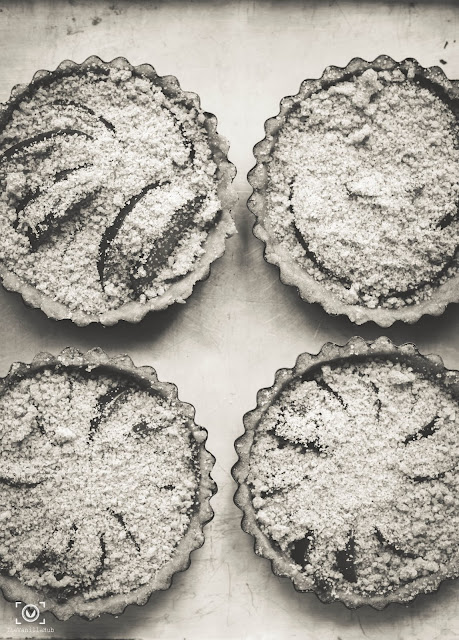
So yeah... I kinda went a bit crazy on the photographing front. Took about 50 photos of these tarts and had a hard time narrowing it down to ten to post here. But I'm sure you guys don't mind the photo spam. I mean, half the people come here probably just to get their dose of food porn right? So feast your eyes away! These tarts definitely are pretty to look at and I really do insist that you try making them so you can feast on them too. The plums loosen up in the heat and release their juices, which entangle with the sugar and butter to yield this rich, tarty, sweet filling. The tanginess of the plums work so well with the pastry. It definitely gives it that extra edge than say if it were a one note sweet fruit... boring... yeah. Although the pastry did turn out really delicate and crumbles in your hands, I think it really is a good pairing - the sharpness of the fruit with the gentle caressing crumbly case. Complimentary right? You can eat it with a spoon.


So yes, give it a go! The original recipe was for one 11-inch tart. But hmmm multiple little ones versus one large one? More is more? Yup, totally in this case. With the little ones, you get a higher pastry to fruit ratio in each bite than with one big one, which is win in my books! So go! Start baking. You have no excuses. You don't need any fancy equipment. Your hands are your mixer. If you don't have a weighing machine, rejoice! Because you don't need one. If you don't have tart cases, worry not, just use a cake tin. Or make little galettes. Or a big one, like this. If you don't have a rolling pin, worry not! Use your hands. You don't even need to use a wine bottle as substitute (which by the way did its job like a boss when my sister and I were baking with my cousin!). You don't even need a bowl to mix the ingredients in. The author of the recipe mixed her pastry straight in the tray. Ok, I think you get the point now, so here's the recipe!

PS. Like me on Facebook if you want updates on my posts!
---------------------------------------------------------------------------------------------------------------------

Plum tarts

Recipe adapted from Amanda Hesser
Serves 8

Pastry

3/4 cups wholewheat flour
3/4 cups all purpose flour
1 tsp salt
1 tsp blended vanilla raw sugar
1/4 cup olive oil
1/4 cup canola or rice bran oil
2 tbsp whole milk or soy milk
Coconut essence

Filling

About 4 plums, pitted and thickly sliced
2 tbsp all purpose flour
1/2 blended vanilla raw sugar
2 tbsp butter, cold

Preheat your oven to 200C. Grease your tart cases.
To prepare the pastry, sift together the flours, salt and sugar. Sift it three times to ensure uniform distribution of salt. Alternatively, stir it with a whisk. In a separate bowl, whisk together the oils, milk and coconut essence, then pour into flour mixture and stir together with a fork until just combined. Take care not to over work. Next, transfer the pastry into the tart cases or tart pan and press onto the base and the sides with your fingers. The pastry should be about half a cm thick. 
For the filling, mix together the flour and sugar then using the tips of your fingers, rub in the butter until the mixture resembles bread crumbs. 
Line the plums on the pastry in whatever pattern you wish. Sprinkle over the butter crumb mixture. It will seem like an excessive amount of butter crumb mixture but it's ok. If you're making little tarts, I suggest putting all the tarts in a tray, then putting the tray in the oven, for easier handling. Bake for about 20-25 minutes until golden. If you're making a large tart, bake for about 35-40 minutes. Take care when you're removing the tarts from the oven as they are hot and bubbly. Rest and cool before serving. 
Serving suggestion: with a dollop of natural yoghurt. Yum!


Sunday, 12 January 2014

Strawberry Mochi and Twenty-fourteen New Year's Resolutions!


I feel like the obligatory new year's post is called for. 2014. A new year. A new start. Goodness people, I'm turning twenty-four this year. TWENTY FOUR. That's nearly half-way through my twenties. Yet I feel like besides snapping a few photos and baking a few cakes, I haven't really accomplished much in life. I went out for dinner with a few friends two nights ago, and a friend of a friend has apparently just bought a house. WHAT? Who does that at twenty-three/four? I feel so damn good sitting there haha, barely employed, barely knowing what I'm doing the next day, yet alone what I'm doing for my career!

Anyways, I'm trying not to let that get to me. Everyone has their own lives and their own achievements, albeit how insignificant. Some people take longer to figure out what they want right? It doesn't matter how much money one earns or what job they do. What matters most is that one is content with what they have. Set goals and sure, aim for the stars, but don't forget the little things in life that are important.


~

So, new year's resolution. I usually have an over-crowded list, but this year I think I should keep it simple and achievable.

1. Relationships. Put more effort into nurturing relationships - family, friends, boyfriend, new friends. I'm not naturally good at making friends or just talking to people in general, so I tend to shy away and keep to my comfort zone. I'm also the most lazy person in terms of staying in touch with friends - bad bad very very bad. So, this year it has to change!

2. Health. Diet and exercise! And sleep! I've always had a fairly healthy diet, so the main thing this year is exercise. No more excuses, it's time to get the ball rolling. Sleep better! Though in this day and age sleeping early would counter my first resolution since most people live a night life.... I'll try my best!

3. Career and education. Work my butt off and get a frikin tip top A in my masters! Also, while doing that, maybe get a part time job related to what I'm studying? Food scientist might not be my first choice as a career, but it's related to it, so it's a good place to start!

4. Creativity. Brush up on my photography and baking skills. Keep up with my blogging. I think at least once a week is fair.

5. Spiritual. "Live like you're dying, because you are". In Buddhism, it is said that the most important moment in one's life is death. Death can come anytime and most people are ignorant of that. Every moment of life is lived to prepare for our death and our after life. Live to our fullest, use our time wisely.

~


Now that that's done and dusted, let me tell and show you about the BEST thing about summer, the thing that I look forward to in earnest year after year - BERRY PICKING!! Every year without fail, my family would go berry picking. Well, in particular strawberry or blueberry, we haven't ventured on to other berries yet. Every trip we'd get over-excited and plop too many of those little jewels into our mouths (k, like having too many is possible?) and over-load the trunk of our car with too many container full of them that our ever full fridge is bursting at the seams even more. So, no room for other berries - sad face. But I don't complain! I love staining my fingers blue with the blueberries and red with the strawberries. I love frolicking in the berry bushes, scouting out what I think would be the sweetest and most flavourful bites.


Anywho, this year I went strawberry picking with friends. We got there with the sun shining directly down at us. We didn't have to venture too far into the fields to be stopped by these crimson morsels. The sight of them draws you in and once you're in there's no turning back! Picking and eating and picking and eating, what more can you ask for. I had to exercise self restrain when it came to bringing the berries home though. Only about 1.5kg this year on mum's strict order of no picking too much! Otherwise who knows? I might bring the whole field home.


So, after enjoying loads of fresh, deliciously sweet strawberries, I decided I'd make something of them. I wanted to make something unusual and after flicking through some books I settled on strawberry mochi! Actually.. first I decided to make a normal mochi with strawberry and coconut filling. I chopped the red babies into little pieces, dropped them in a pot with a sprinkle of sugar and cooked until it turned into a sweet bubbly mess. Then I stirred in coconut cream and vanilla essence. The flavours really do pack a punch! I contemplated stopping there and just freezing it to make ice cream. But no, ambitious me took over. I changed my mind and decided to make it a strawberry flavoured mochi skin. So in went the glutinous rice flour, and in went the mixture into a steamer! Now all seems fine until I tasted the mixture. It was too sour. The cooked strawberries with coconut intensified in sourness once it was cooked for some reason. And guys, believe it or not, I spent hours tinkering with that mixture, trying to fix it. First idea (pshhtt more like the gazillionth idea) was to coat the mochi in toasted coconut, since coconut and coconut, it goes? Didn't really work. In the end I had to drive to the nearest Asian mart to buy some peanuts. The nuts got a nice toast, grind and made friends with sesame, sugar and salt. Finally, after filling the strawberry mochi with heap spoonfuls of that, the edge of the sourness was camo-ed, and it actually tasted good! What a way to kickstart the new year baking huh?


Well, some time during that experience it occurred to me that this might be how my 2014 will be spent. Doing masters and a science project will probably require loads of trial and error, repetitions of experiments, tweaking and tinkering. At the end of the day (literally), resilience will pay off!

PS. As I was making up the recipe as I went, the measurements aren't accurate but are more of a guideline.


---------------------------------------------------------------------------------------------------------------------

Strawberry mochi with peanut filling (GF)

Makes about 50 mochi

Skin

Two handfuls of fresh strawberries, diced
100ml coconut cream
Splash of vanilla essence
1 cup raw sugar, ground
200g glutinous rice flour, sifted
Pinch of salt
Water
Extra glutinous rice flour, lightly toasted

Filling

300g peanuts, toasted and ground
2 handfuls of sesame seeds, toasted
100g raw sugar, roughly ground (to taste)
1 tsp salt

For the mochi skin, place the strawberries and a handful of sugar into a pot and cook until berries are mushed up (no more lumps of berries). Add in the coconut cream and vanilla. Place mixture in a blender and blend until smooth. 
Prepare your steamer and coat a cake tin (or something that fits in your steamer) with oil. While the water is boiling, finish off the skin by adding sugar, rice flour and salt into the liquid mixture. Mix and knead until well incorporated. Add in the water until you get your desired consistency. The mixture should still have a doughy, moist consistency. Drier and harder mixtures will yield harder mochi, while wetter and more runny mixtures will yield softer mochi. It's personal preference what you like, just add water. 
Once the steamer is ready, transfer the mixture into the oiled tin and steam for about 45 minutes. 

To prepare the filling, just mix everything together until well incorporated.

Once the mochi skin is steamed, let it cool before proceeding. 

Place the extra glutinous rice flour in a wide bowl. Drop about 3/4 tablespoonfuls of mochi skin into the rice flour and roll them around to coat. Coat your hands with rice flour and roll the mochi skin into balls, then flatten them. Place teaspoonfuls of peanut filling in the middle of the skins, then wrap them up in whichever shape you wish. Then coat the wrapped mochi with glutinous rice flour. Repeat until all mochi skin is used up.

Enjoy!