Pages

Showing posts with label vegetarian. Show all posts

Wednesday, 18 March 2015

Pineapple Tarts


It feels surreal to be sitting here writing this post rather than researching for and writing my thesis. Everyone who's met me would've asked, how does it feel? Do you finally feel free? I think up until now, I don't particularly feel anything, having jumped straight from the thesis wagon to the work wagon without coming down for a stroll in between. If anything, I feel I have less time to spare. While doing my masters, I had a deadline and a big list of things to do. This meant that if I organised my time well and completed what I needed to do for each week early, then I'd have spare time for other things in life, like baking or ahem.. watching drama. Now, however, work takes up a big chunk of my time, and for the rest of the week, I've got activities packed into my schedule like books on a tight bookshelf. There's no room for a lie down in the sun (though.. what sun?) for a casual novel or magazine. 

That being said, this was what I wanted to do. It wasn't what I envisioned doing post-thesis, but I'm happy. I'm finally taking the time and putting in the effort to learn Traditional Chinese Medicine! There's a whole world of knowledge for me to learn and remember and I feel that there's no time to waste. Do you know that feeling when you're doing something that completely aligns with your beliefs and your core? This is how I feel now. Even though I'm at the infant stage and I don't know where I'll be or what I'm going to do with this knowledge in the future, or thinking more realistically, how am I going to build a career or get some income from it, it feels right. There's a voice in my head telling me, don't worry about the future, I'll naturally figure those issues out. Right now, just focus on building my library of knowledge. Everything has a natural order - growth, development, blossom, anthesis, fruiting. I should take this as my period of growth and development, put in the time and effort to water and fertilize, rather than worry about the flower and fruits that will come naturally when the timing and conditions are right. 


Anyway, pineapple tarts! Not to be confused with the Taiwanese pineapple cakes, these pineapple tarts are a must during Chinese New Year in Malaysia. We eat these by the bucket load and wherever you go during that time of year, you'll see these gold gleaming goodies lining the shelves of supermarkets or people's homes. They come in different shapes and sizes, the most common being ones where the pastry encases the pineapple filling, kind of like a miniature sausage roll. They are absolutely delicious. I mean, who can resist incredibly short, buttery pastry paired with sweet and tangy pineapples fragrant with cinnamon and other spices?

Of course, it's getting more and more difficult to get top quality pineapple tarts. The ones outside were probably made with the bare minimum of pineapple, boosted with some textural agent, and the pastry... you'd be lucky if you get ones that contain any trace of real butter. So, making your own pineapple tarts at home is the way to go! Sure, they'll take a bit of time, as all good things do, but they are seriously worth it. And it's for the new year, so you've got to spend some time preparing these golden fortune bringing cookies to bring good luck and wealth for the rest of the year. 

I know Chinese New Year is now over, but I'm thinking wayyy ahead here! You'll have a whole year to practice making these irresistible delights, because trust me, you'll want to make these throughout the year and not just for CNY because they are that good. 

Pineapple Tarts

For the filling:
1 pineapple
3/4 cups of sugar
1/2 tsp cinnamon powder
a few barks of cinnamon
1/4 tsp nutmeg
4 cloves

For the pastry:
250g butter, room temperature
60g sugar
2 egg yolks (save the egg whites for egg wash)
375g flour
1/4 tsp salt
2 tbsp cornstarch

  1. To prepare the pineapple filling, first top and tail, then skin the pineapple. Cut the pineapple into cubes and then place in a blender and blend until it reaches a smoothie consistency. Transfer pineapple to a deep pot, bring to a boil, then reduce to simmer. Add in the spices and sugar and cook until most of the water has evaporated and you get a mixture that is roll-able (There should not be any more liquid bubbling in the mixture). Set aside to cool. 
  2. For the pastry, beat together the butter and sugar until pale and creamy. Beat in the egg yolks until well combined. Sift in the flour, salt and cornstarch and mix until just combined. Place the pastry onto a sheet of cling film, roll out into approximately 0.7 cm and chill in the fridge until the pastry has hardened (about 30 minutes). 
  3. Using your cookie cutter, cut out the shapes for your pineapple tart. Brush the pastry with the egg whites for egg wash. Take about 1/4 teaspoon of pineapple filling, roll between your palms into a ball and place on the pastry. Press down so the pastry sticks. 
  4. Bake in a preheated to 180C oven for about 15 minutes or until golden. Cool on wire rack before serving. 


Thursday, 23 October 2014

Kimcheese Roll


Kimchi. Cheese. Kimchiiii. Cheeeeese. Kimchiii cheeese. Kimcheeeese. Kimcheese rolls. Kimcheese bread rolls. Rolling kimchi and cheese up in fluffy bread rolls. Kimcheese bread rolls. 


Today's recipe is a savoury one. It is comforting, warm, salty, spicy, cheesy all rolled up in chewy bread. You can eat it as a complete meal. It's got all you need - carbs from the bread, fibre, vitamins and nutrients from the veg, minerals from the seaweed, good source of fat from the sesame seeds and protein from the cheese. You can eat it as an accompaniment to other dishes. You can eat it as a snack for tea time! 


The idea of this dish was born from the craving of salty food. Having tried making bread rolls with kale and cheese, I thought I'd delve deeper and explore other territories of incorporating vegetables in bread. I decided to play on the fusion concept.  In Korean cuisine, cheese is sometimes used. Spicy kimchi noodle soup with cheese on top? Cheese tteokbokki? It's non-traditional, but the spicy, savoury, refreshing taste of kimchi goes really well with the hearty flavours of cheese. Both have satisfying umami flavours, imparted by the glutamate molecules which humans have a huge attraction to. So, why not bring them together in a fluffy bread roll? 


While I am neither skilled nor in possession of time (presently) for making the traditional nappa cabbage kimchi, I decided to adapt kimchi flavours in making this quick, non-fermented 'kimchi'. Asian cooking is all about the balance in flavours - layers of spiciness from the Korean chilli flakes, fresh chilli, ginger and onion, saltiness from salt, soy sauce and nori, sweetness from tomato and a sprinkle of sugar, tanginess from tomato, all of these lifted by the nuttiness of sesame oil. The vegetables are all sliced finely into roughly the same sizes, bathed in hot brine to extract moisture and develop crunch, then tossed in the spicy sauce. Let me tell you, it was so mouthwatering and I had to refrain myself from eating straight from the pot. Had to remind myself to save some for the bread!

The 'kimchi' itself was so yummy. Just imagine it laced with melted cheese. Then all this caressed by that warm, chewy, fluffy bread. Irresistible!


Kimcheese Rolls

Makes 12 rolls 

For the bread: 
3 cups of strong flour
2 cups whole grain/mixed grain flour 
1 tbsp salt 
2/3 cup rolled oats
1/3 cup corn grits
2 cups water (luke warm)
1 tbsp yeast 
1/3 cup olive oil
1 tbsp maple syrup 

For the kimchi:
1 leaf of cabbage
1 leaf of kale
1/4 carrot
1 apple
1 sheet of nori
3 tbsp toasted sesame seeds

For the spicy sauce:
1 small chilli
4 tbsp Korean chilli flakes
1/4 shallot 
1/2 tomato 
1cm ginger 
1 tbsp raw sugar
salt and soy sauce to taste 
1 tbsp sesame oil 

100g Colby (or similar) cheese


  1. For the bread, mix all the dry ingredients together until well incorporated. Stir together water, yeast, olive oil and maple syrup and add to the dry ingredients. Start off by mixing with a butter knife until the dough starts coming together. Then tip the contents onto a clean bench and knead until dough is elastic and smooth (about 10-15 minutes). Place the dough in a large oiled bowl, cover with a damp cloth or plastic wrap and let it proof for about 1-2 hours until double in size. 
  2. In the meantime, prepare the spicy sauce. Finely chop all the raw ingredients for the spicy sauce. With a mortar and pestle or a blender, pound or blend all the ingredients the chilli, chili flakes, shallot, tomato and ginger until a paste forms. Transfer to a small saucepan, add in the sugar, salt and soy sauce and cook until fragrant (a few minutes). Turn the heat off. 
  3. Bring a pot of water to boil. Meanwhile, finely chop your vegetables for the kimchi. Once the water has boiled, turn the heat off and add a tablespoon of salt. Stir until salt has dissolved. Place the vegetables in the brine and leave for about 10-15 minutes. Drain. 
  4. Dress the vegetables with the sauce. Add in the finely chopped apple, torn up sheet of nori and sesame seeds. Stir until combined. 
  5. Knock down the bread, then briefly knead the dough, folding it in on itself so the smooth side is exposed. Roll the dough out into a rectangle, about less than 1cm thick. Pile on and evenly spread the kimchi (you won't use all of it). Then grate the 3/4 of the cheese onto the dough. Tightly roll up the dough, making sure the filling is all sealed in. Divide into 12 pieces and place on a line baking tray. Let the dough proof a second time until double in size (about 45 minutes). 
  6. Half an hour into the second proofing, preheat the oven to 180C. Once the dough is ready, top with the remaining 1/4 of cheese and bake for about 20 minutes or until nice and golden. 
  7. Remove from oven, and cool slightly on a wire rack before serving with some of the kimchi. 


Wednesday, 15 January 2014

Pasta with a twist! - Spicy strawberry, tomato and oregano


I've had a massive craving for pasta just before we went on the cruise and it lasted for about two months. Reason? I've been watching too many of the videos by The Chiappa Sisters (GO WATCH THEM IF YOU HAVEN'T ALREADY). They make pasta look so easy to make. 100g of flour and 1 egg with a pinch of salt. Stir in the egg in the flour volcano, knead, rest, roll. Ah... then the door of pasta is opened to you. Anything from luscious ribbons of fresh pasta paired with a drizzle of olive oil with a generous grating of parmessan to delicate little farfalle bows covered with creamy cheese and spinach are now within your reach... The thought of it just makes you salivate.


And now, after a month of food fest, you'd think that pasta craving would go away. NEVAAAHHH. Since my house does not hold any double zero flour, unfortunately I have not been able to make any fresh pasta...*cue sadface*. But luckily we do have the next best thing, dried packet pasta! And since I always like to spice things up a bit, and possibly go overboard with the ingredients list, I didn't just settle for a simple say olive oil + cheese + thyme pasta, although that would be lovely. 

As much as I'd like to claim this idea for myself, I do need to give credit to none other than Mr. Hugh Fearnley-Whittingstall (what a last name) from River Cottage! In that episode of River Cottage To the Core, Hugh made a savoury strawberry salsa. With the abundance of strawberries that this season offers us, I thought, why not give it a try? Now, savoury strawberries... Why does it work? Well if you think about it, tomato is technically a fruit and it works like magic in savoury dishes. Strawberries, like tomatoes, have a lot in common. Firstly, they're both red, and guys don't underestimate this factor. Secondly, they're both sweet. Thirdly, when cooked, they release a wonderful tanginess (which sometimes may or may not work in other dishes *cough* like this strawberry mochi). 

So, addressing my cravings for pasta and my curiosity about savoury strawberries, the spicy savoury strawberry pasta was thus born. The sauce was basically inspired by ingredients I had in my fridge - giant tomatoes, quarter of a capsicum (alliteration yay!), crunchy snow peas, baby carrots, strawberries! And since the oregano bush kinda took over a huge patch in my garden, what other herbs to use than it! And of course, red wine, olive oil, chilli, garlic, cheese, salt and loads of pepper for added flavour. And believe it or not, this was only the second time I cooked with red wine. Last week I made a similar pasta dish with my friend Sam, and she glugged in red wine to the bubbling tomato sauce. It was yummy. So this pasta sauce met the same fate. And just a side note, like baking with chocolate, you wanna cook with red wine that you'd drink, not some cheap stuff coz the end result would also be cheap tasting. Makes sense right? Good + good =  amazing. Bad + good = mediocre. And you definitely want amazing pasta!


So, end result! It's a pretty summery red dish which screams, 'STOP! ...And eat me!' It's got loads of texture from the crunchy snow peas and baby carrots. It's got a kick from the chilli, which you can definitely tone down if you can't take spice, but spiciness is part of the fun in eating. It's got deep umami flavours from the cheese and red wine. The oregano sings and freshens up the dish. And the star, the strawberry definitely shines, especially with that extra cracking of pepper. Give it a try! If you do, Instagram or Facebook it with #thevanillahub and I'll check it out! 

Also, if you like my posts so far, like me on Facebook too!
---------------------------------------------------------------------------------------------------------------------

Spicy strawberry, tomato and oregano pasta

Serves 2

2 handfuls of pasta (I used elbow pasta)*
1/2 pot of boiling water in a fairly big pot
Salt

1 clove of garlic, finely chopped
1 large tomato, with 4/5 diced up, save 1/5 finely sliced for decoration
1 baby carrot, diced really finely
1/4 capsicum, diced
4 medium sized strawberries, finely diced
 4 large snow peas, diced 
1 strawberry, sliced for decoration
Chilli flakes
Handful of fresh oregano leaves (basil would work too) + extra for garnish
Red wine, about half a cup
Olive oil
Parmessan
Salt and pepper

Boil a pot of water. Once the water has boiled, drop in a generous pinch of salt and your pasta.** 
Meanwhile, prepare your sauce. Drizzle oil in a pan and once the pan is hot, drop in the garlic. Stir until it starts to turn golden then put in the 4/5 of tomato, carrot, capsicum and 4 strawberries. Let it bubble away until the tomatoes and strawberries start to break down. Add in the snow peas, chilli flakes, oregano and red wine. Stir it a bit and let it sit on medium heat until the sauce thickens. The sauce should have a dropping consistency, not too runny, but not completely thick. If you do overcook it, just slush in some more red wine and let it reduce. Season your sauce with salt and pepper. Trust me, LOADS of pepper makes this dish, since strawberry and pepper love each other. 
Transfer your al dente (still retains a bite) pasta into the saucepan. Stir so each pasta is covered with sauce. Grate in the parmessan and stir to mix. 
Now plate up! Decorate with tomato and strawberry slices. Garnish with oregano, grate more parmessan and crack more pepper on top. Serve. 

*I'm a fairly small eater, so this much is enough. But if you love your pasta like my friend Sam feel free to double the portions! You can always save the leftovers for the next day!
**To make sure you don't over-cook the pasta, you can choose to start cooking it half-way through the sauce-cooking process. Pasta should take about 12 minutes to cook, but taste-testing it helps. Remember, DO NOT put oil in the pot that you're cooking your pasta!! The oil layer will prevent the water from boiling and hence the pasta from cooking properly.


Saturday, 21 September 2013

Savoury bread pudding


I am tongue tied and have writers block today. Actually, I've had writer's block for days. I've been meaning to write this blog post for days, but haven't had time to edit the photos. But here it is now!


Well, what's happened these past few days? My dad's left for Malaysia, back to tend to his business and visit my grandmother, relatives and friends. Mid-semester break's over. It passed so quickly and slowly at the same time. It was mooncake/mid-autumn festival on Thursday! I have an abundance of mooncake at home and am thinking of learning how to make them for next year's festival. I realised that we're pretty lucky here. Mooncakes are pretty expensive, but the cheapest you can get is about $20 per box of four. But in Malaysia, mooncakes can cost up to RM20 for one! Which is around NZ$10. And apparently in China, you can get a mooncake that's even more astoundingly priced... thousands of dollars for one! WHAT?! Is it made out of diamonds and gold? And who the heck would buy that? 


Now that i've told you what's happened, I can tell you what will happen! (Not that it'll affect you in anyway, but I'm super excited about it!) My family is going back to malaysia next January for Chinese New Year! Yay! It's been 2 years since I last went back, and even longer since I last celebrated Chinese New Year back home. Can't wait to see the row after row of New Year snacks packed in red containers, the red and gold lanterns adorning the malls and streets, to get sick of hearing Chinese New Year songs, to eat all the food that I didn't savior during my childhood, and of course, the best part of all, to see my grandmothers, aunties, uncles and cousins! And we might be going to China too! It's gonna be a great holiday. Now... time to find a way to earn some money. 


Anyway, I'm sorry that today's post is fairly unexciting for you. My writer's block still lingers on. Hopefully the photos and recipe idea entertained you! And I've got to get back to preparing for a seminar on Monday about carotenoids in carrots! Interesting and important little pigments these are. I'll share more later on on it! 

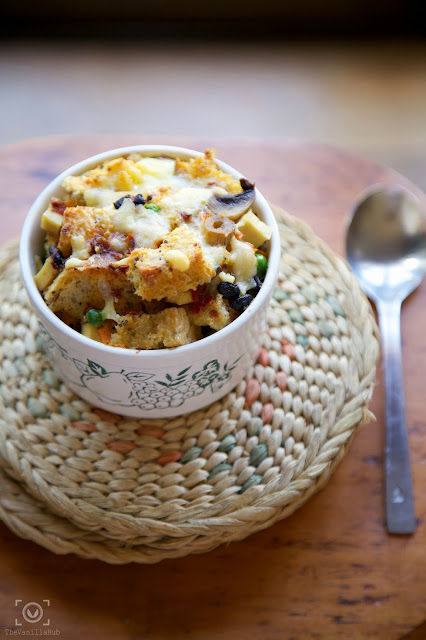
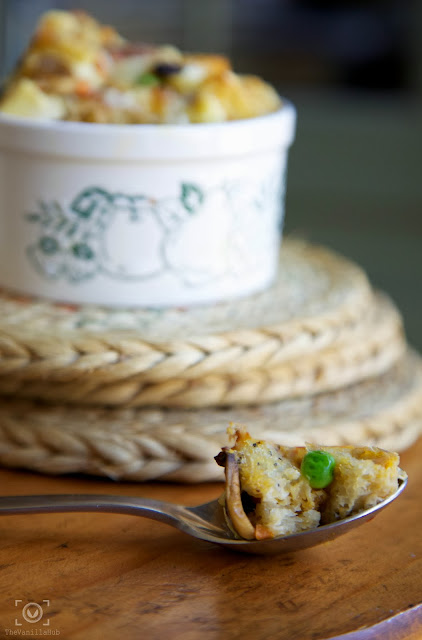
But now, I will share a recipe for savoury bread pudding. Follow on from the savoury theme, this recipe is a twist from the traditional and conventional sweet bread and butter pudding. It's healthy, it's tasty and you don't feel guilty eating it! Admittedly, the idea came from somewhere else - Spoon Fork Bacon (these guys are awesome), though I did not follow their recipe. I made this for lunch one day when I was home alone. I actually made another version of it again for Peter and I put some leftover herby tomato sauce that my dad made and Peter called it 'Pizza in a bowl' haha. Interesting. It looked and smelled delicious but i didn't take a photo of it :( 


[Savoury Bread Pudding]
Serves 1 
You can easily multiply the ingredients to make a big pudding, and substitute any of these ingredients with whatever you have on hand.


1 ramekin
Olive oil
1 thick slice of good bread
1 medium size button mushroom, thickly sliced
about 1 tablespoon of green peas
1 square of firm tofu (about 4cm x 4cm), cubed
Some carrots, about 1 tbsp in total, cut into the tiniest cubes (these give amazing little crunches as you bite into the pudding)
1 egg
splash of milk (soy milk or other milk works too)
salt
pepper
1 teaspoon chilli paste (omit it if you want, but a bit of spice kicks this up a notch! I used a chilli paste with black beans in it and wow the black beans go really well with cheese!) 
Tasty cheese, about 1 tbsp, grated

1. Preheat your oven to 200C.
2. Oil the sides of the ramekin.
3. Roughly rip your bread up into little pieces and toss them in olive oil. Set aside. 
4. In a little pan with olive oil, lightly cook the mushrooms until coloured. Set aside.
5. Mix the bread, mushroom, tofu and veg together and drop them into the ramekin. 
6. Whisk together the egg, milk, salt, pepper and chilli together. You don't have to whisk the egg too thoroughly. I quite like how you get bits of egg whites laced through bits of egg yolks. 
7. Pour the egg mixture into the ramekin, over the filling, carefully. 
8. Top with grated cheese.
9. Bake for about 10-15 minutes.
10. Serve! 

This recipe takes no time to make at all and you can enjoy your lunch in under half an hour! Do the cleaning and washing up and make yourself a good cup of tea while you wait for the pudding to bake. Enjoy!


Friday, 13 September 2013

Buckwheat/soba noodles with flat mushrooms and seaweed


Cooking isn't my forte. I'd take baking over cooking any day. BUT. My family's been trying to cut down on eating sweet food lately and mum's complaining that she gained a belly and lots of weight from eating my baked goods! Ah the joys of living with a baker. So, I thought I should venture more into these foreign waters. Start by gingerly dipping my toes in, adjust to the temperature, then slowly wade my way through to the deeper ends. 


I found that cooking is just like swimming. Not that I swim much. In fact, I haven't swum in... 5 years? 7 years? A rare case seeing that I live literally 5 minutes drive from the beach and NZ is so much of a water loving country. I've only learnt to swim when my family moved to NZ, which was about 10 years ago. And ever since those swimming lessons at the YMCA pools in Year 8, I haven't really had the inkling to dip myself in a pool of water. Anyway, like swimming, cooking is about relaxing yourself and following your instincts. I used to be afraid of cooking (can you believe?), preferring whisks and oven over frying pan and stove. But I think I'm gradually acclimatizing to the cooking scene. And I think noodles and pasta are a good place to start. 


My dad is a renowned cook amongst friends and family. His skills and passion for cooking were inherited from my grandma, who is also a renowned cook amongst her friends and family. Since migrating to this faraway land, we haven't had much opportunity to enjoy grandma's cooking. But my dad sort of makes up for it. It was through my dad's knack for cooking and his years of experimenting and skill-honing in vegetarian cuisine that I think, my family were so easily acclimatized (this word again, yes!) to eating vegetarian food. Of course throughout these years we still occasionally cook meat, though in a much smaller portion. But around three months ago, my dad turned full vegetarian. I of course eat whatever was on the table so vegetarian it is. And even when I eat out I order vegetarian food as I'm not used to eating meat. Although if I'm in a circumstance where I'm presented with meat, such as going to a friend's house and they cooked meat, I will eat it but try to eat less of it since it would be really troublesome for them to prepare something special or different for me. 


So, noodles! Everybody loves noodles don't they? I admit, I'm more of a rice gal though I won't say no to the occasional noodle. My dad, my sister and my boyfriend Peter love noodles. I swear they can live solely on noodles. My sister always has these random noodle cravings. Especially the Korean ones. Spicy and hot, with an egg cracked into it, slurp slurp slurp yum! And to be honest, noodles are so quick and easy to prepare (compared to a lot of other dishes). Today, we'll start with buckwheat or soba noodles. 


These noodles are really great as they already have a sweet, almost nutty flavour from the buckwheat flour. When you buy them from the supermarket it pays to check the ingredients as some of them have a high percentage in wheat flour rather than buckwheat. I prefer ones made just with buckwheat flour and water and do not contain other sorts of flavouring or additives. They're better for you! 

I cooked these soba noodles the non-traditional way and these are served hot rather than cold. For the vegetable pairings I used things I found in my fridge. The mushroom and chinese cabbage really adds that more complex, umami flavouring which goes well with the salty, weathered ocean taste from seaweed (I used a mixture of kombu and wakame). The carrots and celery lends sweetness and with a touch of sesame oil, the whole dish comes together in a nutty coating. Enjoy! I didn't use any animal products, so this dish is unintentionally vegan! And gluten free too for you celiacs out there!


[Buckwheat noodles with flat mushroom and seaweed]
Serves 5

A handful of buckwheat noodles. (The noodles came divided into portions tied with little ribbons. Use 3 portions. They will swell up a lot!)

1/2 inch ginger, finely chopped
5 medium to big sized flat mushrooms, cut into thick strips 
2 button mushrooms, cut into strips
4 leaves of chinese cabbage, cut into thick strips
half a carrot, julienned
1 stalk of celery, julienned
1 bowl (chinese rice bowl) of kombu and wakame, broken into small pieces
Water 
Sprig of parsley

Seasoning
Olive oil
Soy sauce
Salt
Pepper
1/2 teaspoon of raw sugar (trust me, it helps)
Sesame oil

1. Fill up half a pot of water. Turn on the element for the water to boil.
2. Mean while, in another deep pan, drizzle in olive oil and wait for it to become hot. Add in the ginger and fry until lightly golden. Add the carrots and celery and stir for about a minute. Add in mushrooms and stir until it starts to brown (make sure to have enough oil in the pan or the mushrooms will stick). Add in the chinese cabbage and about a cup of water. Season with soy sauce (about 3 or 4 tablespoons - adjust it to your liking but remember the seaweed is slightly salty too). Cover to simmer. 
3. Once the chinese cabbage has softened (you want it nice and soft for the sweetness to shine), add in the kombu and wakame. Simmer until softened. Season with salt and pepper to taste. Stir in the sugar. Turn off the heat and drizzle in about a tablespoon of sesame oil (you do this with the heat off as heat causes sesame oil to lose its flavour). 
4. Place the buckwheat noodles in the other pot of boiling water. It will take only a few minutes for it to cook. (Do not cover the pot with a lid, it will bubble out! Yea.. found that out the hard way lol). Once the buckwheat noodles are cooked, transfer them onto another pot or container with cold water. 
5. Place buckwheat noodles onto a serving dish. Pour the vegetables on top of the buckwheat noodles. Garnish with a sprig of parsley. Serve! 

There you go, easy. I think the key is to have your mise en place ready. Once you have everything chopped up, ready to go, it's easier to relax and enjoy the cooking process. I am by no means a good cook, in fact, I'm still a beginner! So if I can do it, you can too. Happy cooking!