Pages

Showing posts with label bread. Show all posts

Sunday, 25 January 2015

Cinnamon, Hazelnut and Chocolate Swirl Bread


Now, I really should be writing my thesis. But after week after week of labouring in front of my computer, abusing my eyes by staring at the screen from morning till night, and gaining weight from sitting and eating all day long, I thought I should pick myself up and work on something else for a change.

I've said it many times, but I love love love bread making! I think all bread-makers do. There is just something that's so magical and captivating about the whole process. If I had to choose between baking a cake and making bread, I'd choose bread any day. I am still nothing but an amateur though, learning by reading (only onto Chapter 2 in Flour Water Salt Yeast by Ken Forkish but I'm learning so much already!), watching (Paul Hollywood. Such a legend in the bread world. I love watching how he handles the dough with such confidence and care) and practicing. Slowly, I'm observing how small changes in the breadmaking factors can alter the structure and taste of it. (Can you tell I've been reading a lot of scientific literature?)


Two weeks ago I made Jamie Oliver's Sexy Swedish Buns. It came out alright. Everyone loved it. The flavours were bang on but I found the bread a bit too dry and dense for my liking. Then reading Ken Forkish, he mentioned that his doughs are highly saturated with water, which will facilitate the development of a softer bread. Makes sense. Also his breads are slowly fermented, starting off not by using warm water/liquid which so many modern recipes call for, but that of room temperature. The reasoning behind this is that slow ferments, as Paul Hollywood also mentioned, allows for the development of a richer and much more aromatic bread. Yeast and bacteria work together in this gentle process, releasing much esters, acids and other flavour compounds that would not have been produced at a higher temperature. Microbiology. Amazing.

In Michael Pollan's book Cooked, he discussed the symbiotic relationship between man and microbes. We rely so heavily on these microorganisms that we can't even see (90% of the cells in our bodies are bacterial cells!). In bread-making in particular, the yeasts break down the carbohydrates into components that are more easily digested. This only happens when they are allowed sufficient time in the fermentation process. The conventional 2-hour rise just doesn't cut it. Pollan also theorised that perhaps that is why so many of us develop gluten intolerances these days. The bread that we are eating nowadays have not been given enough time for the carbohydrates to be 'pre-digested' by the Saccharomyces. Our bodies have to work a lot harder in the digestion of bread and some people lack the enzymes for it.


So I tried the recipe again. This time adding more water and butter to the dough. All ingredients are at room temperature. Mixing the dough is pretty much impossible because of how wet it is. But I know the importance of developing that gluten to give strength to the bread. So I kneaded the super sticky dough for about 10 minutes. Because it was an enriched dough (it has egg and butter in it), it was almost like a brioche dough. And then I gave the dough lots of time to rise. It's such a hot summer day and ideally I should leave the dough overnight in the refrigerator for maximum development of flavour, but I wasn't THAT patient. I'll try that next time though.


After about three hours, I went to check on the dough. It has tripled in size and the gluten network is so much more developed compared to my first attempt of that recipe. I know it will turn out incredibly soft. After spreading, filling and shaping the dough, I gave it more time to redevelop that beautiful network structure. That structure is what makes the bread super soft and fluffy. So all in all it took about 6 hours to make the bread. That's a lot of time (though not as long as Ken Forkish's breads). But I only worked on the dough for 25 minutes. The rest of the time, it's all the yeast's and the bacteria's work.

The bread turned out incredibly moist, soft and fluffy. I'm so excited! This is only the beginning of my bread journey. I sincerely ask you to hop on my bandwagon. Twenty minutes worth of work and this is what you get. It's definitely much much better than any supermarket bread. It's so delicious and more importantly it doesn't contain any of the rubbish additives that those so-called breads contain. It tastes even more amazing knowing that you've nurtured it and brought it to life. And seriously, there's nothing better than the smell of bread and your family and friends would be so happy if you share it with them!


Cinnamon, Hazelnut and Chocolate Swirl Bread

For the bread:

350 g high grade flour
50 g wholewheat flour
80 g raw sugar, blended
1 tsp cinnamon
1/2 tsp cardamom 
Pinch of nutmeg
1 1/2 tsp yeast 
180 ml soy milk (or any milk you have on hand)
70 ml water
50 g melted butter
1 egg
1 tsp salt

For the filling:

3 tbsp cinnamon
1 cup chopped hazelnuts 
20 g chopped dark chocolate 

For the decoration:

Raw sugar
Melted chocolate

1. Stir together all the dry ingredients. Set aside. 
2. Stir together all the wet ingredients. Stir the wet ingredients into the dry ingredients. I find using a butter knife is the easiest and most efficient. You can use a stand mixer with a dough hook attachment if you wish. Knead for about 10 minutes until the dough is smoother. It will still be incredibly wet and won't really hold its own shape. 
3. Oil a large bowl, place the dough inside and cover with cling film. Leave at room temperature to proof until it has tripled in size. This will take about 3 hours on a warm day. 
4. Knock down by punching the dough. Tip the dough out onto an oiled surface and spread the dough into a rectangle using your hands. Oil your hands to make the process easier. 
5. Sprinkle the filling on evenly. Roll the dough up like a log and shape into desired shape. Place on lined baking tray.
6. Leave to proof a second time for about 1 and a half hours. Remember to cover with cling film. Then preheat your oven to 200C. Place a bowl of water in your oven to create steam. This will allow for a more even bake. 
7. Once your oven is preheated, sprinkle raw sugar on the dough then place in the oven to bake for about 12-15 minutes until golden.
8. Remove from oven. Look underneath your bread to check whether your bread is done. It should be nice and golden. When you tap your bread, it should sound hollow. 
9. Cool on wire rack. In the mean time, melt some chocolate over a water bath. Drizzle onto your bread. 
10. Serve.

Tips:

1. Take your time with making bread. Use room temperature ingredients. A good pointer from Ken Forkish is treat time and temperature as ingredients. Long time at low temperature is what you're aiming for. 
2. It's important to use high grade flour, which contains larger amounts of gluten that will give you a really soft and fluffy bread. For this bread, I used 00 flour. 
2. Place a bowl of water in your oven to create steam. Remember to use a heat-proof bowl. Steam will create an even temperature environment so your bread will bake more evenly. Also, it will slow down the baking of the surface of the bread, allowing your bread to rise more. 


Thursday, 23 October 2014

Kimcheese Roll


Kimchi. Cheese. Kimchiiii. Cheeeeese. Kimchiii cheeese. Kimcheeeese. Kimcheese rolls. Kimcheese bread rolls. Rolling kimchi and cheese up in fluffy bread rolls. Kimcheese bread rolls. 


Today's recipe is a savoury one. It is comforting, warm, salty, spicy, cheesy all rolled up in chewy bread. You can eat it as a complete meal. It's got all you need - carbs from the bread, fibre, vitamins and nutrients from the veg, minerals from the seaweed, good source of fat from the sesame seeds and protein from the cheese. You can eat it as an accompaniment to other dishes. You can eat it as a snack for tea time! 


The idea of this dish was born from the craving of salty food. Having tried making bread rolls with kale and cheese, I thought I'd delve deeper and explore other territories of incorporating vegetables in bread. I decided to play on the fusion concept.  In Korean cuisine, cheese is sometimes used. Spicy kimchi noodle soup with cheese on top? Cheese tteokbokki? It's non-traditional, but the spicy, savoury, refreshing taste of kimchi goes really well with the hearty flavours of cheese. Both have satisfying umami flavours, imparted by the glutamate molecules which humans have a huge attraction to. So, why not bring them together in a fluffy bread roll? 


While I am neither skilled nor in possession of time (presently) for making the traditional nappa cabbage kimchi, I decided to adapt kimchi flavours in making this quick, non-fermented 'kimchi'. Asian cooking is all about the balance in flavours - layers of spiciness from the Korean chilli flakes, fresh chilli, ginger and onion, saltiness from salt, soy sauce and nori, sweetness from tomato and a sprinkle of sugar, tanginess from tomato, all of these lifted by the nuttiness of sesame oil. The vegetables are all sliced finely into roughly the same sizes, bathed in hot brine to extract moisture and develop crunch, then tossed in the spicy sauce. Let me tell you, it was so mouthwatering and I had to refrain myself from eating straight from the pot. Had to remind myself to save some for the bread!

The 'kimchi' itself was so yummy. Just imagine it laced with melted cheese. Then all this caressed by that warm, chewy, fluffy bread. Irresistible!


Kimcheese Rolls

Makes 12 rolls 

For the bread: 
3 cups of strong flour
2 cups whole grain/mixed grain flour 
1 tbsp salt 
2/3 cup rolled oats
1/3 cup corn grits
2 cups water (luke warm)
1 tbsp yeast 
1/3 cup olive oil
1 tbsp maple syrup 

For the kimchi:
1 leaf of cabbage
1 leaf of kale
1/4 carrot
1 apple
1 sheet of nori
3 tbsp toasted sesame seeds

For the spicy sauce:
1 small chilli
4 tbsp Korean chilli flakes
1/4 shallot 
1/2 tomato 
1cm ginger 
1 tbsp raw sugar
salt and soy sauce to taste 
1 tbsp sesame oil 

100g Colby (or similar) cheese


  1. For the bread, mix all the dry ingredients together until well incorporated. Stir together water, yeast, olive oil and maple syrup and add to the dry ingredients. Start off by mixing with a butter knife until the dough starts coming together. Then tip the contents onto a clean bench and knead until dough is elastic and smooth (about 10-15 minutes). Place the dough in a large oiled bowl, cover with a damp cloth or plastic wrap and let it proof for about 1-2 hours until double in size. 
  2. In the meantime, prepare the spicy sauce. Finely chop all the raw ingredients for the spicy sauce. With a mortar and pestle or a blender, pound or blend all the ingredients the chilli, chili flakes, shallot, tomato and ginger until a paste forms. Transfer to a small saucepan, add in the sugar, salt and soy sauce and cook until fragrant (a few minutes). Turn the heat off. 
  3. Bring a pot of water to boil. Meanwhile, finely chop your vegetables for the kimchi. Once the water has boiled, turn the heat off and add a tablespoon of salt. Stir until salt has dissolved. Place the vegetables in the brine and leave for about 10-15 minutes. Drain. 
  4. Dress the vegetables with the sauce. Add in the finely chopped apple, torn up sheet of nori and sesame seeds. Stir until combined. 
  5. Knock down the bread, then briefly knead the dough, folding it in on itself so the smooth side is exposed. Roll the dough out into a rectangle, about less than 1cm thick. Pile on and evenly spread the kimchi (you won't use all of it). Then grate the 3/4 of the cheese onto the dough. Tightly roll up the dough, making sure the filling is all sealed in. Divide into 12 pieces and place on a line baking tray. Let the dough proof a second time until double in size (about 45 minutes). 
  6. Half an hour into the second proofing, preheat the oven to 180C. Once the dough is ready, top with the remaining 1/4 of cheese and bake for about 20 minutes or until nice and golden. 
  7. Remove from oven, and cool slightly on a wire rack before serving with some of the kimchi. 


Tuesday, 7 January 2014

Bagel with warm herbed salad and egg


Oh my gosh! I've been gone for so long. Hope everyone's had a fantastic festive christmas and a wonderful new year! I definitely had plans to fill this site with amazing food for those two occasions but these plans were dissolved into thin air by a big ship and a plane to Melbourne. I do apologise for my long absence but this trip has been amazing, despite having a cold/flu/hayfever for the most part of it. 


I've never been on a cruise ship before, so I didn't know what to expect. The first few days were really relaxed as we settled in to the rocky rhythm. As aforementioned, food was of abundance. However due to my sickness and being bed-ridden, I actually lost weight on board! The journey took a positive turn on about day six when we met several other people around our age. Each night was filled with loads of card games and we got everyone hooked onto Mafia. Who knew playing Mafia with kids would be so fun haha. I only wished my cold didn't hit me then, I could've spent more time doing more productive things than watching movies in bed. 


All journeys come to an end. Of course, it was right when friendships were forged we had to say goodbye. Though it was awesome that our new friends in Sydney took us to karaoke and on a semi tour of Sydney city on our one night stay there. My trip to Melbourne was significant too. We visited our auntie, uncle and cousins whom we haven't seen in more than 10 years! Sydney has a big city edge to it while Melbourne is more mellow and suburban. I really love Melbourne's vibe, the colourful Chinatown, picturesque Yarra River, hipster cafes, the malls!, the countless restaurants and eateries and not to mention the presence of extended family. It's a vibrant city and I have many many many photos to showcase it! Please be patient though... I haven't had a chance to edit any yet *gasp!* as my brother's been occupying the computer with Lightroom ever since we got back. 


This trip to Melbourne has opened up my heart and I can feel the city's magnetic pull. It's definitely a city I would strongly consider to live in. Though I did feel strange being in such a flat city. The view of Melbourne from the plane was just like a vast stretch of quilt, so different from the hilliness of Auckland. After spending new year's eve with cousins counting down at Federation Square and watching the spectacular fireworks that went on for about 20 minutes, the family and I flew back to our big little city called home. Yet again it felt strange that we didn't have to travel hours to get to places. The single lane roads, the miniature city skyline, the empty streets welcomed us home in its gentle embrace. 

Anywho, as promised, here's the second post on bagels! It's perfect for brunch. It's healthy. It's filling. It's delicious. It's colourful. Enjoy it while I let my thoughts float between the to do lists of reality and dreaminess of the trip. 


---------------------------------------------------------------------------------------------------------------------

Bagel with warm herbed aubergine, fungus and tomato salad, topped with fried egg

Serves 4

Handful of wood-ear fungus
Handful of oyster mushrooms
Half a medium aubergine, diced
1 tomato, diced
zest of 1 lemon
About 1/2 tbsp of cumin seeds, toasted
About 1/2 tsp ginger, finely chopped
Oregano leaves, about half a handful, finely chopped
Olive oil
Soy sauce
Salt and pepper

4 eggs
4 halves of bagels

In a pot, bring about half a cup of water to a boil. Drop in the wood-ear and oyster mushrooms. Pour about 1 tbsp of soy sauce in. Turn down to medium heat and let it cook until all water is evaporated and the fungus has softened. Set aside.
In a hot saucepan, pour in some olive oil and throw in the ginger. On medium heat, stir until it begins to brown. Drop in the aubergine and cook until softened (still has a slight bite to it), tossing occasionally. Add some more olive oil if aubergine sticks to the pan. Stir in the tomato, fungus, cumin seeds and oregano leaves. Cook until the tomato has softened. Season with soy sauce, salt and pepper. You'll need quite a bit of soy sauce. Add in the lemon zest and stir. Cook for about 1 minute. 
Plate up and serve with bagels. 
For each serving, fry (or poach) an egg and place atop the bagels. Season with soy sauce and pepper.
Serve. 


Saturday, 14 December 2013

New York Bagels


It seems rather fitting to make a post about NY bagels on board an American cruise ship. It is currently day four of our twelve day tour with Celebrity Solstice. We sailed from Auckland, stopped by Bay of Islands and Tauranga before arriving at Wellington this morning.  The weather's been mighty fine so far and the ocean vast and blue. This is our first cruise and everyone's been so nice. I suppose being on a holiday puts everyone in a good mood. Aside from the occasional rockiness and motion sickness, this trip has been relaxing. With an abundance of food on board that is available almost twenty four seven, it feels like all we've been doing all day is eat, sleep, walk. I haven't been as eager to take that many photos, just a few here and there of what I thought captured the essence of each location. I'll be sharing more about the trip once I get home and have a chance to edit the photos! So stay tuned for that!


Now about these bagels.  I got pretty obsessed with making them. They're much easier to make than I anticipated. You'll need some elbow grease for the kneading, but working for your food makes it more delicious doesn't it? It also makes the bagel chewy and bouncy! The recipe I pinched from The Sophisticated Gourmet, altering only the types of flour and the amount of salt. The bagels are so tasty. The wholewheat flour that I added gives a subtle sweetness to the bread that makes the bagels perfect treats even just by themselves.  Of course, they're great bases to the usual PB and J, but if you're feeling more up to it, you could whip up a warm salad and fry or poach an egg and there we go, a satisfying and nutritious lunch you'll have.  I made a warm, herby eggplant, tomato and fungi salad, of which I'll share with you soon!


Unlike Auckland which currently only have one store that specializes in bagels (Best Ugly Bagels), the ship has an abundance of it. I haven't gotten around to it yet though. Just been devouring their deliciously fluffy rye bread. But I don't feel too deprived. These bagels were just that amazing.

New York bagels 

Makes 8

2 tsp dried yeast
2 tbsp raw sugar
1/2 cup warm water
3/4 cup warm water
2 cups high grade unbleached plain flour
1 cup wholewheat flour
2 tsp salt

Pour dried yeast and sugar in the 1/2 cup of water and let it sit for 5 minutes without stirring. After 5 minutes, stir until sugar and yeast diasolves.
Combine flour and salt and make a well in the centre. Pour in the yeast mixture and begin stirring together. Gradually add in the 3/4 cup of water and continue to stir in. You may or may not need all the water. The dough should be moist and firm. Knead the dough for about 10 minutes on a floured surface with floured hands. The dough should end up firm and elastic and don't feel sticky. When you press down on the dough with your finger it should gently bounce back.
Place the dough in a large oiled bowl and leave to rest in a warm place, covered with a wet tea towel, for an hour until double in size. Knock down and let rise for another 10 minutes.
Divide the dough into 8 and shape each one into round doughs. To shape, place the dough on the counter top and cup your hand over it. Move your arm in circular motions, pressing the dough down with slight pressure. Once all doughs are done, coat a finger in flour and press into the middle of the dough to make a hole, like a doughnut. The hole should be 1/3 the size of the dough.  Repeat with the rest. Leave in a warm place covered for 10 minutes. Meanwhile, boil a pot of water and preheat oven to 220C.
Once the water is boiled, reduce heat to a simmer. Drop the bagel doughs into the pot and cook for about 1 to 2 minutes on each side. Don't over-crowd the pot. The doughs will float and expand. Drain on wire rack then bake in the oven on a tray lined with lightly oiled baking sheet for about 20 minutes until golden.
Serve with your favorite topping! 


Wednesday, 27 November 2013

Cinnamon and raisin bread

Today I will just flood your feed with loads of pictures. Pictures of nice fluffy, cinnamony bread. It's comforting to make. It's soft as a baby's bottom. It brings alive your kitchen. It's nourishing to the soul especially when you spread on some floral honey. Honey, cinnamon and raisin, such a delicious combination. 

Recipe is taken from The Pastry Affair, with minor adjustments. I substituted half a cup of wholewheat flour into the bread flour and added some walnuts into the dough to give some contrast in texture. For the 'cinnamon swirl' I added nutmeg and roughly chopped walnuts. It's delish. 


Saturday, 21 September 2013

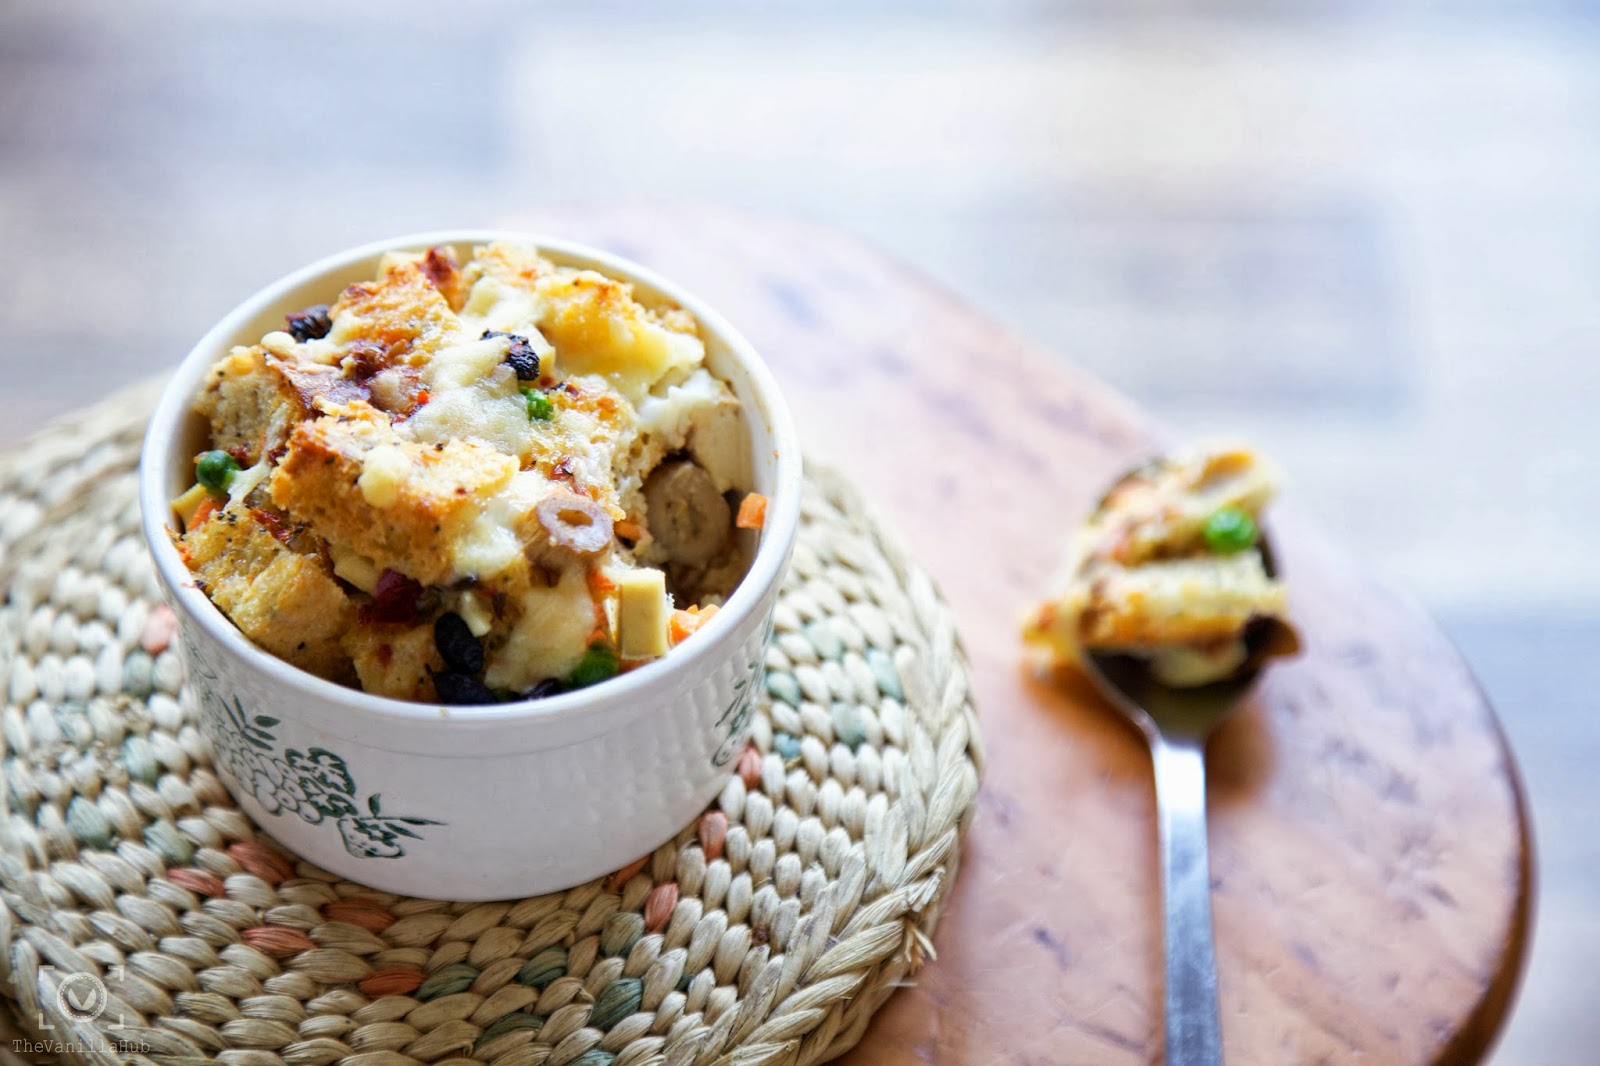
Savoury bread pudding


I am tongue tied and have writers block today. Actually, I've had writer's block for days. I've been meaning to write this blog post for days, but haven't had time to edit the photos. But here it is now!


Well, what's happened these past few days? My dad's left for Malaysia, back to tend to his business and visit my grandmother, relatives and friends. Mid-semester break's over. It passed so quickly and slowly at the same time. It was mooncake/mid-autumn festival on Thursday! I have an abundance of mooncake at home and am thinking of learning how to make them for next year's festival. I realised that we're pretty lucky here. Mooncakes are pretty expensive, but the cheapest you can get is about $20 per box of four. But in Malaysia, mooncakes can cost up to RM20 for one! Which is around NZ$10. And apparently in China, you can get a mooncake that's even more astoundingly priced... thousands of dollars for one! WHAT?! Is it made out of diamonds and gold? And who the heck would buy that? 


Now that i've told you what's happened, I can tell you what will happen! (Not that it'll affect you in anyway, but I'm super excited about it!) My family is going back to malaysia next January for Chinese New Year! Yay! It's been 2 years since I last went back, and even longer since I last celebrated Chinese New Year back home. Can't wait to see the row after row of New Year snacks packed in red containers, the red and gold lanterns adorning the malls and streets, to get sick of hearing Chinese New Year songs, to eat all the food that I didn't savior during my childhood, and of course, the best part of all, to see my grandmothers, aunties, uncles and cousins! And we might be going to China too! It's gonna be a great holiday. Now... time to find a way to earn some money. 


Anyway, I'm sorry that today's post is fairly unexciting for you. My writer's block still lingers on. Hopefully the photos and recipe idea entertained you! And I've got to get back to preparing for a seminar on Monday about carotenoids in carrots! Interesting and important little pigments these are. I'll share more later on on it! 

But now, I will share a recipe for savoury bread pudding. Follow on from the savoury theme, this recipe is a twist from the traditional and conventional sweet bread and butter pudding. It's healthy, it's tasty and you don't feel guilty eating it! Admittedly, the idea came from somewhere else - Spoon Fork Bacon (these guys are awesome), though I did not follow their recipe. I made this for lunch one day when I was home alone. I actually made another version of it again for Peter and I put some leftover herby tomato sauce that my dad made and Peter called it 'Pizza in a bowl' haha. Interesting. It looked and smelled delicious but i didn't take a photo of it :( 


[Savoury Bread Pudding]
Serves 1 
You can easily multiply the ingredients to make a big pudding, and substitute any of these ingredients with whatever you have on hand.


1 ramekin
Olive oil
1 thick slice of good bread
1 medium size button mushroom, thickly sliced
about 1 tablespoon of green peas
1 square of firm tofu (about 4cm x 4cm), cubed
Some carrots, about 1 tbsp in total, cut into the tiniest cubes (these give amazing little crunches as you bite into the pudding)
1 egg
splash of milk (soy milk or other milk works too)
salt
pepper
1 teaspoon chilli paste (omit it if you want, but a bit of spice kicks this up a notch! I used a chilli paste with black beans in it and wow the black beans go really well with cheese!) 
Tasty cheese, about 1 tbsp, grated

1. Preheat your oven to 200C.
2. Oil the sides of the ramekin.
3. Roughly rip your bread up into little pieces and toss them in olive oil. Set aside. 
4. In a little pan with olive oil, lightly cook the mushrooms until coloured. Set aside.
5. Mix the bread, mushroom, tofu and veg together and drop them into the ramekin. 
6. Whisk together the egg, milk, salt, pepper and chilli together. You don't have to whisk the egg too thoroughly. I quite like how you get bits of egg whites laced through bits of egg yolks. 
7. Pour the egg mixture into the ramekin, over the filling, carefully. 
8. Top with grated cheese.
9. Bake for about 10-15 minutes.
10. Serve! 

This recipe takes no time to make at all and you can enjoy your lunch in under half an hour! Do the cleaning and washing up and make yourself a good cup of tea while you wait for the pudding to bake. Enjoy!