Pages

Showing posts with label olive oil. Show all posts

Wednesday, 15 October 2014

Non-bake Granola Bars


I have reached a milestone! I feel like I am on holiday now. I FINALLY finished the lab component of my thesis!!!! No more late nights and weekends in the poorly ventilated lab. No more standing for hours and hours on end, endlessly pounding apples and getting frostbites and weird brain freezes from liquid nitrogen. No more sniffing acetone and methanol. No more skipping meals because experiments take so long. No more!!!

Though oddly enough, as much as I disliked doing lab work, I feel like I will definitely miss walking around in my lab coat and safety glasses between levels 5, 1 and 7 of the Chemistry building. As much as I hated handling chemicals, I felt that through the past few months, I have actually come to terms with it, and I admit, towards the end, I actually quite enjoyed it. This could possibly be because the last experiments I was doing produced really awesome samples (Check out my Instagram). My pigments extractions actually looked really pretty! The vibrant green chlorophylls from Granny Smith peel, pastel yellow from Envy flesh and bright pink anthocyanins from Royal Gala are definitely eye-catching.


I feel like I've learned a lot from doing experiments. Not only the laboratory skills, I've also learned how to work with others. When I first started doing lab work, I think I was pretty selfish and self-centred. All I really cared about was that I had so much to do and I wanted to get everything done as soon as possible. But in real life, it doesn't really work that way. The lab isn't just for me. I had to work with lab technicians and peers, make compromises in terms of when to use the machines, sharing equipments and things like that. Certain times when I had to work at other people's lab, it was all on their schedule. Time management and planning became a huge part, especially when I had to plan my way around the few limited days that I could do the analyses and before my analyses I had to do so many lots of eight-hour-long extractions. And sometimes when you've spent days extracting your samples and they don't turn out good, that really tested your patience and persistence.

But I have to say, that few months, though exhausted as heck (and naturally, grumpy as ****), looking back now I wouldn't have done it any other way. There were times when I felt extremely lonely and questioning, when I was by myself desperately doing my work in the late hours on a Sunday night. Or that poignant moment when I bought dinner in between experiments and considered sitting down in the restaurant as a table for one. What was the point in working so hard? Why do I come in weekend after weekend, rejecting invites for late night BBQs or Mario Kart parties? But then I reminded myself, it will all be worth it when I FINALLY FINISH. When I finally start writing and start seeing my thesis slowly come together piece by piece. But gosh, seeing how hard everybody works, I can't complain at all. And friendships really are forged, when you drag your sleep deprived bodies into lab together, or when you share stories of how you accidentally pissed off the lab technician again, or when you just randomly rant about boys or admire girls with good genes that have time to go to gym and have super toned sexy legs. No, I wouldn't have had it any other way.


Though all these weeks I worked tirelessly, pushing myself to the brink of exhaustion, literally sometimes feeling like I could just keel over in between grinding apples, possibly knocking over that flask of liquid nitrogen, spilling it on my already dead hands, there was something else that I learned. That was to trust my intuitions. When that voice in your head says 'go home, don't start that experiment', you go home. Because chances are, you will screw up 50% of the things, you will make the stupidest mistakes and end up having to repeat again. Your instincts know best.

While doing my lab work, I more often than not ended up bingeing on sugary stuff which I convinced myself was good for the soul, despite my body sending out all these clear signals to STOP. Now that lab is over, I feel like a detox is definitely called for. I made these nut and oats bar as an inspiration from the lab I was tutoring and also to help me transition into a no-sugar lifestyle. And oh my gosh, these are SO GOOD!!! I should, but I actually can't stop eating them. They are so addictive. You won't believe that there's no refined sugar or anything added. The nuts provide the delicious crunch. All the natural ingredients - coconut, honey, olive oil, peanut butter, cocoa nib, they really do instill soo much flavour into the bar. And they are so so easy to throw together too! You don't even have to turn your oven on. They make a really nutritious snack and if you're like me, eat it for breakfast too. Definitely give it a go!

Non-Bake Granola Bars

Recipe inspired by Eat Well NZ

Makes 18 bars

Dried ingredients: *
3/4 cup rolled oats
1/2 cup red rice flour (or regular white rice flour)
1/3 cup pumpkin seeds
1/3 cup desiccated coconut
1/3 cup sunflower seeds
1/3 cup raisins 
1/4 cup walnuts, broken into smaller pieces
2 tbsp cocoa nibs
1 tsp cinnamon 
1/2 tsp Himalayan or sea salt 

 Wet ingredients:
1/4 cup extra virgin olive oil
1/4 cup honey
1/4 cup peanut butter
1 tbsp maple syrup 

1. Stir together all the dried ingredients. 
2. In a non-stick pan, dry toast the dried ingredients on medium heat until fragrant. Make sure to stir constantly. This is to lightly toast the nuts and to cook the rolled oats and rice flour. Also, the cocoa nibs, coconut and seeds will release their oils that will be instilled into the whole bar. Set aside. 
3. In a saucepan, stir together all the wet ingredients on low heat until melted and well incorporated. This will only take about a minute or two. 
4. Pour the wet ingredients over the dry ingredients and mix well. 
5. Line a 9x9cm square tin with baking paper. Press your nut and oat mixture into the tin firmly, using your hands to make it level. 
6. Refrigerate your bars overnight or for 4 hours. 
7. Cut into 18 bars (3 x 6). 
8. Serve. 

*You can choose to use other nuts and seeds, anything that you happen to have on hand!

Wednesday, 15 January 2014

Pasta with a twist! - Spicy strawberry, tomato and oregano


I've had a massive craving for pasta just before we went on the cruise and it lasted for about two months. Reason? I've been watching too many of the videos by The Chiappa Sisters (GO WATCH THEM IF YOU HAVEN'T ALREADY). They make pasta look so easy to make. 100g of flour and 1 egg with a pinch of salt. Stir in the egg in the flour volcano, knead, rest, roll. Ah... then the door of pasta is opened to you. Anything from luscious ribbons of fresh pasta paired with a drizzle of olive oil with a generous grating of parmessan to delicate little farfalle bows covered with creamy cheese and spinach are now within your reach... The thought of it just makes you salivate.


And now, after a month of food fest, you'd think that pasta craving would go away. NEVAAAHHH. Since my house does not hold any double zero flour, unfortunately I have not been able to make any fresh pasta...*cue sadface*. But luckily we do have the next best thing, dried packet pasta! And since I always like to spice things up a bit, and possibly go overboard with the ingredients list, I didn't just settle for a simple say olive oil + cheese + thyme pasta, although that would be lovely. 

As much as I'd like to claim this idea for myself, I do need to give credit to none other than Mr. Hugh Fearnley-Whittingstall (what a last name) from River Cottage! In that episode of River Cottage To the Core, Hugh made a savoury strawberry salsa. With the abundance of strawberries that this season offers us, I thought, why not give it a try? Now, savoury strawberries... Why does it work? Well if you think about it, tomato is technically a fruit and it works like magic in savoury dishes. Strawberries, like tomatoes, have a lot in common. Firstly, they're both red, and guys don't underestimate this factor. Secondly, they're both sweet. Thirdly, when cooked, they release a wonderful tanginess (which sometimes may or may not work in other dishes *cough* like this strawberry mochi). 

So, addressing my cravings for pasta and my curiosity about savoury strawberries, the spicy savoury strawberry pasta was thus born. The sauce was basically inspired by ingredients I had in my fridge - giant tomatoes, quarter of a capsicum (alliteration yay!), crunchy snow peas, baby carrots, strawberries! And since the oregano bush kinda took over a huge patch in my garden, what other herbs to use than it! And of course, red wine, olive oil, chilli, garlic, cheese, salt and loads of pepper for added flavour. And believe it or not, this was only the second time I cooked with red wine. Last week I made a similar pasta dish with my friend Sam, and she glugged in red wine to the bubbling tomato sauce. It was yummy. So this pasta sauce met the same fate. And just a side note, like baking with chocolate, you wanna cook with red wine that you'd drink, not some cheap stuff coz the end result would also be cheap tasting. Makes sense right? Good + good =  amazing. Bad + good = mediocre. And you definitely want amazing pasta!


So, end result! It's a pretty summery red dish which screams, 'STOP! ...And eat me!' It's got loads of texture from the crunchy snow peas and baby carrots. It's got a kick from the chilli, which you can definitely tone down if you can't take spice, but spiciness is part of the fun in eating. It's got deep umami flavours from the cheese and red wine. The oregano sings and freshens up the dish. And the star, the strawberry definitely shines, especially with that extra cracking of pepper. Give it a try! If you do, Instagram or Facebook it with #thevanillahub and I'll check it out! 

Also, if you like my posts so far, like me on Facebook too!
---------------------------------------------------------------------------------------------------------------------

Spicy strawberry, tomato and oregano pasta

Serves 2

2 handfuls of pasta (I used elbow pasta)*
1/2 pot of boiling water in a fairly big pot
Salt

1 clove of garlic, finely chopped
1 large tomato, with 4/5 diced up, save 1/5 finely sliced for decoration
1 baby carrot, diced really finely
1/4 capsicum, diced
4 medium sized strawberries, finely diced
 4 large snow peas, diced 
1 strawberry, sliced for decoration
Chilli flakes
Handful of fresh oregano leaves (basil would work too) + extra for garnish
Red wine, about half a cup
Olive oil
Parmessan
Salt and pepper

Boil a pot of water. Once the water has boiled, drop in a generous pinch of salt and your pasta.** 
Meanwhile, prepare your sauce. Drizzle oil in a pan and once the pan is hot, drop in the garlic. Stir until it starts to turn golden then put in the 4/5 of tomato, carrot, capsicum and 4 strawberries. Let it bubble away until the tomatoes and strawberries start to break down. Add in the snow peas, chilli flakes, oregano and red wine. Stir it a bit and let it sit on medium heat until the sauce thickens. The sauce should have a dropping consistency, not too runny, but not completely thick. If you do overcook it, just slush in some more red wine and let it reduce. Season your sauce with salt and pepper. Trust me, LOADS of pepper makes this dish, since strawberry and pepper love each other. 
Transfer your al dente (still retains a bite) pasta into the saucepan. Stir so each pasta is covered with sauce. Grate in the parmessan and stir to mix. 
Now plate up! Decorate with tomato and strawberry slices. Garnish with oregano, grate more parmessan and crack more pepper on top. Serve. 

*I'm a fairly small eater, so this much is enough. But if you love your pasta like my friend Sam feel free to double the portions! You can always save the leftovers for the next day!
**To make sure you don't over-cook the pasta, you can choose to start cooking it half-way through the sauce-cooking process. Pasta should take about 12 minutes to cook, but taste-testing it helps. Remember, DO NOT put oil in the pot that you're cooking your pasta!! The oil layer will prevent the water from boiling and hence the pasta from cooking properly.


Friday, 22 November 2013

Kale, mushroom and tomato salad


Summer came along so abruptly. One week I'm all layered up drinking tea and stuck behind my desk till the quiet hours of night. The next week I'm out in shorts and tees, slathering sunscreen on my gradually tanning skin while tramping with friends. What contrast. It certainly is a much welcomed change (apart from the mossies that come with it). After so many weeks of sitting (I kid you not. Uni does that to you), it feels so good to be out running around in the sun. In the past week I had mild insomnia, my mind wouldn't stop racing about what to do about my future and my body clock would wake me up at 8.30 in the morning no matter how late I sleep. But today, after a full day's worth of walking and climbing, at just 9pm I'm feeling exhausted. Of course I can't wait for a satisfying night's sleep but I shall share with you this deliciously simple salad! It's perfect for the weather Auckland is currently experiencing. But for those on the other half of the hemisphere, it'll go fantastically with a warm creamy bowl of soup.


True to my style of cooking, it really is use-whatever-you-have-in-your-fridge. For this salad, I combined the brilliantly green kale with earthy mushrooms, silverbeet, raw and cooked tomatoes and croutons. It's sort of inspired by Jamie Oliver's tomato salad that he made on 30 Minute Meal. Unfortunately in Auckland you can't get all those fancy tomatoes! Nonetheless, it still tastes delicious with that drizzle of olive oil, lemon and parmessan. Use this 'recipe' as a 'template' and turn those leftover veg in your vege drawer into a healthy lunch!

Kale, Mushroom and Tomato Salad

Serves 3 

4 thick slices of bread, broken into bite size pieces
3 leaves of kale, washed and chopped into 2cm strips
1 leaf of silverbeet, washed and chopped into 2cm strips
3 tomatoes, washed and chopped into 1-2cm cubes
6 medium sized button mushrooms, cut into quarters or sixes
Handful of oregano, chopped
Handful of grated parmessan
Olive oil
Zest of half a lemon
Juice of half a lemon
Salt and pepper to taste

1. Coat the bread in olive oil and toast in oven until crunchy, about 10 minutes on 180C. You may add some garlic to perfume your croutons. 
2. Toss mushrooms in olive oil and fry until golden and shrunken. Season with salt and pepper. Set aside in a large bowl.
3. Wilt kale and silverbeet in the same pan used to fry mushroom. Place into the bowl containing mushrooms. 
4. Take half of the chopped up tomatoes and soften in pan with olive oil and oregano. The tomatoes will turn into mush and the flavours will intensify. This will act like a sauce for the salad. Add to the large bowl.
5. Add in the lemon zest and croutons and drizzle in some olive oil. Season and toss to mix well. 
6. Serve as is or with a warm bowl of soup. 

Saturday, 21 September 2013

Savoury bread pudding


I am tongue tied and have writers block today. Actually, I've had writer's block for days. I've been meaning to write this blog post for days, but haven't had time to edit the photos. But here it is now!


Well, what's happened these past few days? My dad's left for Malaysia, back to tend to his business and visit my grandmother, relatives and friends. Mid-semester break's over. It passed so quickly and slowly at the same time. It was mooncake/mid-autumn festival on Thursday! I have an abundance of mooncake at home and am thinking of learning how to make them for next year's festival. I realised that we're pretty lucky here. Mooncakes are pretty expensive, but the cheapest you can get is about $20 per box of four. But in Malaysia, mooncakes can cost up to RM20 for one! Which is around NZ$10. And apparently in China, you can get a mooncake that's even more astoundingly priced... thousands of dollars for one! WHAT?! Is it made out of diamonds and gold? And who the heck would buy that? 


Now that i've told you what's happened, I can tell you what will happen! (Not that it'll affect you in anyway, but I'm super excited about it!) My family is going back to malaysia next January for Chinese New Year! Yay! It's been 2 years since I last went back, and even longer since I last celebrated Chinese New Year back home. Can't wait to see the row after row of New Year snacks packed in red containers, the red and gold lanterns adorning the malls and streets, to get sick of hearing Chinese New Year songs, to eat all the food that I didn't savior during my childhood, and of course, the best part of all, to see my grandmothers, aunties, uncles and cousins! And we might be going to China too! It's gonna be a great holiday. Now... time to find a way to earn some money. 


Anyway, I'm sorry that today's post is fairly unexciting for you. My writer's block still lingers on. Hopefully the photos and recipe idea entertained you! And I've got to get back to preparing for a seminar on Monday about carotenoids in carrots! Interesting and important little pigments these are. I'll share more later on on it! 

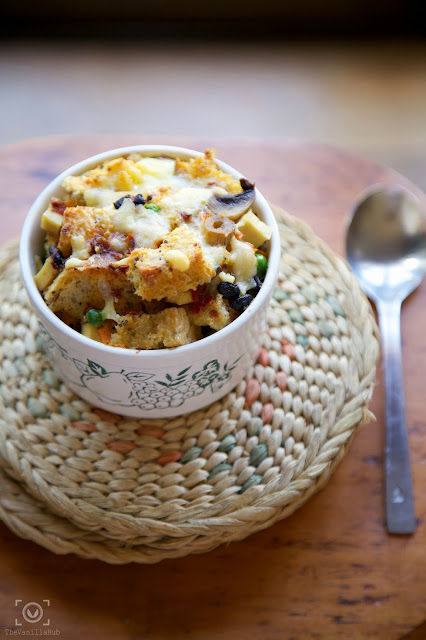
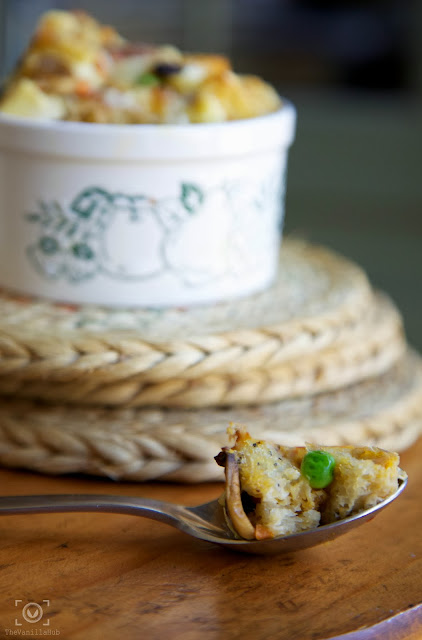
But now, I will share a recipe for savoury bread pudding. Follow on from the savoury theme, this recipe is a twist from the traditional and conventional sweet bread and butter pudding. It's healthy, it's tasty and you don't feel guilty eating it! Admittedly, the idea came from somewhere else - Spoon Fork Bacon (these guys are awesome), though I did not follow their recipe. I made this for lunch one day when I was home alone. I actually made another version of it again for Peter and I put some leftover herby tomato sauce that my dad made and Peter called it 'Pizza in a bowl' haha. Interesting. It looked and smelled delicious but i didn't take a photo of it :( 


[Savoury Bread Pudding]
Serves 1 
You can easily multiply the ingredients to make a big pudding, and substitute any of these ingredients with whatever you have on hand.


1 ramekin
Olive oil
1 thick slice of good bread
1 medium size button mushroom, thickly sliced
about 1 tablespoon of green peas
1 square of firm tofu (about 4cm x 4cm), cubed
Some carrots, about 1 tbsp in total, cut into the tiniest cubes (these give amazing little crunches as you bite into the pudding)
1 egg
splash of milk (soy milk or other milk works too)
salt
pepper
1 teaspoon chilli paste (omit it if you want, but a bit of spice kicks this up a notch! I used a chilli paste with black beans in it and wow the black beans go really well with cheese!) 
Tasty cheese, about 1 tbsp, grated

1. Preheat your oven to 200C.
2. Oil the sides of the ramekin.
3. Roughly rip your bread up into little pieces and toss them in olive oil. Set aside. 
4. In a little pan with olive oil, lightly cook the mushrooms until coloured. Set aside.
5. Mix the bread, mushroom, tofu and veg together and drop them into the ramekin. 
6. Whisk together the egg, milk, salt, pepper and chilli together. You don't have to whisk the egg too thoroughly. I quite like how you get bits of egg whites laced through bits of egg yolks. 
7. Pour the egg mixture into the ramekin, over the filling, carefully. 
8. Top with grated cheese.
9. Bake for about 10-15 minutes.
10. Serve! 

This recipe takes no time to make at all and you can enjoy your lunch in under half an hour! Do the cleaning and washing up and make yourself a good cup of tea while you wait for the pudding to bake. Enjoy!


Tuesday, 27 August 2013

Lemon yoghurt cake

Being a vegetarian for me is not difficult.  Especially when my family is mostly vegetarian and my dad makes the most delicious vegetarian dishes ever. There are many more plant based food out there, so many more delicious choices that you can choose from to feel deprived of the few meat selection that we don't eat. A trip to the morning market will leave you filled with such joy from seeing the colourful produce. 


Eating out is of course a different matter. Majority of the restaurants have menus that are dominated by the meat selection.  Although there has been an increase in awareness of special diets consumers and most restaurants do have a few dishes to accommodate vegetarians but it is still that isn't it? To accommodate rather than to celebrate. But anyway, I am not that picky. Even though I would love to see the veg scene in Auckland expand, I am glad that at least most restaurants do offer vegetarian options. And if they don't, most places are more than happy to omit the protein part of the dish if you ask nicely. I mean, it saves them money. 


Over the past week I have been tied down by tests and assignments. One assignment in particular was especially difficult for me to do. It is about meat. Just my luck. We had to discuss the reactions of myoglobin, which is the main protein in meat responsible for meat colour, which also translates as meat quality in most consumers' eyes. After 4 weeks of procrastination, and a final week of forcing myself to research and write, I managed to squeeze out about 4000 words. (So glad that the lecturer said to NOT write 6000 words but rather to ere on the halfway mark as he's got a pile of thesis to go through alongside our assignments.) By about an hour before the deadline, I've truly had enough. I have tried my best in writing about something I am passionately against. I felt saddened by some facts that I read. Like wow, global meat consumption increased by a whopping 600% since 1950. How many kgs of meat are people eating per year? How many animals are being killed each day just so humans could enjoy the taste of it for a curt few seconds/minutes? Why must human build our enjoyment on others' suffering? 

Anyway, after I handed in the assignment, I headed straight home. As I passed my front lawn, I noticed the daisies have sprung up, white and yellow in the sea of green. That sight cleared my mind. I just love how strongly survival driven plants are. Just a few days of heavy rain and the soil have moistened enough for these plants to shoot out. Odd as it is for daisies to bloom in August, signaling the premature arrival of spring, I felt comforted by the thought that the season of growth is upon us. 


I am also glad that the winter fruits are still in full bloom! Our lemon tree in our backyard's been having a field day (month). So much yellow!!! So much happiness!! So much earthy satisfaction and pure joy just looking at them!! I love lemons. They're like laughter growing on a tree. That vibrant colour just blows away any dark clouds in your mind. So. In celebration of winter's gifts and early spring, I made a comforting lemony lemon cake :) 

[Lemon Yoghurt Cake]
280g flour (I used 200g unbleached AP flour + 40g wholemeal flour + 40g almond meal. The almond meal makes it much moister)
3 tsp baking powder
1/2 tsp salt
2 eggs
140g raw sugar, blended
1 tsp raw honey
1 tsp vanilla
zest of 2 lemons
juice of 2 lemons 
250ml natural yoghurt
120ml olive oil

1. Preheat oven to 180C. Line an 8 inch cake tin. 
2. Sift together flour, baking powder and salt. Set aside. 
3. Beat together eggs, sugar and honey until thick and pale. 
4. Add the vanilla, zest and juice of lemon. Beat until well incorporated. 
5. Stir in the flour mixture until just combined. 
6. Stir together olive oil and yoghurt until well mixed. Add to the cake mixture. Stir until just combined.
7. Pour into the lined cake tin and bake for approximately 45 minutes or until skewer inserted comes out clean, cake is well coloured and firm but slightly bouncy to the touch. 
8. Remove from oven and cool in tin for 10 minutes before removing the cake from the tin and cooling on a wire rack. 
9. Serve as is or with a dollop of yoghurt.